
In my time writing some APIs and micro services, I’ve faced some problems with multi database environments. On the company I’ve worked at that time, we have a lot of environments for a lot of different clients, but they always used the same database model, but on different servers. You can ask, but why? Well, some of our clients had some restrictions, based on region, and other requirements, and that’s not the point. At the beginning, this was not a problem, but came a time, where we need to connect to every single database to get/put some data, but how?
At first, you will come with the same idea as we already have used for at least 8 years, we can have an instance of the same application running on multiple servers, each one inside the environment, or we can have multiple instances of the same application running on a centralized server. Both will force us having a lot of the same code running alongside each other, and that’s not one of the best approaches in terms of maintenance, and to check later, we will have to do a lot of checks on different servers. How can we solve this?
Centralize the solution

One of the things that we thought at the time was to build a single application to handle every call to every server/database/environment, unifying all the requests on a single robust server, and turning our managing life much easier. As good spring developers, we looked for the best approach for this, and looking on how spring work with dependency injection and his mumbo jumbo things, we found our solution, and it’s simple as making a juice.
Building our App

For this application, we will use some of the spring boot packages. From now on, I will assume that you have the same dependencies in your pom.xml as I have. To help you out with this, the spring guys have built an awesome tool to help you start fast, it is spring initializr and we will set our group and artifact name as we like, and we will use the following dependencies for this example:
- JPA
- PostgreSQL
- Rest Repositories
I’ve selected PostgreSQL, but you can use with any database connector you like, because nothing will change, even with NoSQL databases this will do. On the time this article was written, spring boot 1.4.3 was the release of the time, so let’s stick with this version (but nothing will prevent you from using another version, I’ve used this approach since 1.3.X). To manage our project dependencies, I’m using maven, but you can stick with gradle too if you prefer.
After assembling your tools, let’s begin with some planing after going into the dirty work. On this example, we will have multiple databases on multiple servers running the same database structure on each one. We can assume that we have multiple environments, or multiple clients or even different levels of deployment that we need to connect to test, query or insert new data. To make our tests more easy to set up, instead of having several different databases on multiple servers, we will have 2 or more database instances on the same server, because, this is not “important” in a code point of view. Let’s assume that we have 3 databases and we are running our application on a centralized server (127.0.0.1) with access to all of this databases.
- server A (jdbc:postgresql://127.0.0.1:5432/db1)
- server B (jdbc:postgresql://127.0.0.1:5432/db2)
- server C (jdbc:postgresql://127.0.0.1:5432/db3)
Based on the request data, we will identify the correct database, and them we will change our connection to use the correct database. This identification will be automatic, based on some parameter that will arrive on the request. Once we have the correct database, we will then change the request to this hibernate connection, and everything will go on as expected on a single database connection. This identification can be based on the request IP, some identification parameter on the request or anything you like it, but the premise to this is that you can change the database anytime, based on some parameter on your request, in a way that your client will never know or see.
To manage multiple database connections, we will use the @Qualifier annotation, so we can call every connection by it’s name. In our example, we will make the connection change based on the request URL, and we will control it using our hosts files to fake our DNS, so we can have multiple URLs calling to the same server in an easy way. To do that, you will have to edit certain files depending on the OS you use.
Mac OS, sudo nano /private/etc/hosts

Linux, sudo nano /etc/hosts

Windows, c:\Windows\System32\drivers\etc\hosts
Our database will be consisted of one simple table just to exemplify. We will use mockaroo website to randomly generate some mock data to begin with. This website is amazing for generating some test data to play with, and you can generate 1000 lines per file for free, and this can help you accelerate your tests with some random data.
As IDE, I will use IntelliJ IDEA, from Jetbrains, an awesome IDE, but you can use whenever IDE you prefer, and you can ever use none, any text editor will do, but I do prefer IntelliJ because it’s simple, clean, fast and reliable.
Writing it down
First things first. Let’s run that SQL file in our database, to create and populate our database. Don’t forget to check first your SQL file, because some DBMS use different kind of data types. Inside the repository, you will find a SQL folder, with 2 SQL files, one called PERSONS_Original.sql and other called PERSONS.sql, note that I’ve changed the PERSONS.sql to fit the PostgreSQL data types, but I let the original file as well just for comparison.
OK let’s start it. First we will import our package from Spring initializr, to gain some time. After importing, let’s first create our model, our database representation in code. Create a new package inside your current package, and call it “models”. This way, we will begin to separate some of our code in groups, or packages. Packages are nothing more than folders inside our structure, but they receive a different name. Create our Person.java class inside it, and write down the properties representing all the database fields. We will use some annotations to mark some of our properties, like @NotEmpty and @NotNull, so we will gain some level of data validation before we save it. We will use a generation strategy for our primary key, so we will not need to worry about some primary key duplication. To mark this class as an entity, we will use the @Entity and the @Table annotations, to mark this class and bind it to the right table in our database. You will notice that I use CamelCase on my property names, because I’m used to it. Alright, let’s see our first class implemented.
Now, let’s build some code to pull it out of the database, let’s build our Data Access Object, and for most of our time as developers, we used to write a lot of DAO code, but now with spring and it’s magic tricks, we can resume all of that code with a simple interface. Create a repository package, and inside it, create an interface called PersonRepository.java.
Hold on a minute buddy, where is all that database connection stuff, where are those ton of lines of code to connect, pull and parse an object. Calm down, let’s explain it a little bit. Using Spring Data magic, we can extend our repository interface with CrudRepository, and pass to this Generic interface which object we want to pull (in our case the Person) and what is the type of it’s primary key (a Long type), and this way, this interface will be automatic implemented by spring data, and we will not need to write a dozen of lines of code just to build a query. We will see how easy is to consume this interface very soon.
Now it’s time to connect to our database. Let’s begin with some configuration class. Create a config package, and create a java class called DatabaseMain.java inside it. This will be our main connection, and from now on, we will write down a lot of annotations in this class.
Holly Jolly, that’s a huge class right? Let’s split it a little bit. From lines 22 to 29, we have some annotations to mark this class as a configuration class, so spring boot will pick this class to load while it’s starting. Second, we have EnableTransactionManagement, so we set this connection to support transactions, then we have ComponentScan, a spring annotation that tell spring boot to scan the listed package to pick all the classes bellow this annotation to manage it when possible (when annotated to be honest). After that, we have PropertySource, an annotation that bind a file, so we don’t need to implement a class to read all the configurations from our config file. Easy don’t you think? And last, we have EnableJpaRepositories, and this is an important annotation. With this, we are telling hibernate that this class is a repository, and we are setting the base packages, or the package from where hibernate will begin to scan for @Entity classes, we also set the name of our Entity Manager and Transaction Manager, the guys responsible for managing the connections and transactions.
After that, we have a lot of @Value annotations. This annotation bind a value from the config file we have passed through @PropertySource annotation, to a property. We just need to bind a parameter to a property using this annotation. Then we begin with our configurations. First we build the data source, or the connection to the database. With this bean (as you have noticed we annotate this class with @Bean so we mark it to spring boot manage it, remember the ComponentScan annotation?), we can pass it to other managed beans to connect to our database. After this, we build our entity manager bean, passing down the connection (data source), and passing the package to scan property. We also build the transaction manager, the session factory and we finish it passing the hibernate properties as well. Looks big but in the end, it’s very simple. We are just making a connection to the database, nothing too complicated at the end. But did you noticed the @Primary annotation on every managed bean? We will discuss it later.
Now create a file in root of our project called database.properties and put all this @Value content inside it, and fill all the parameter with the connection information. Use mine as example and after finish it, let’s move to our first test.
As a lazy developer, I always go through the smaller road, as Bill Gates said, “I choose a lazy person to do a hard job. Because a lazy person will find an easy way to do it.”, so to test our code, I choose to make a rest repository, so we can test if we are getting all the results from out query. Let’s build it. Create a package called rest, and create our PersonRest.java
Once again, a clean class, we have the RestController Annotation to mark this class as a rest controller, so we are not returning HTML content, but we are returning some JSON content instead. We put some RequestMapping annotations, so we can map some URLs to our calls. We bind our repository here using @Autowired annotation, so spring will have our repository ready to be used. But look inside the getAll method, and …… there is just one single line. That’s all. Of course we are not expecting any exceptions, remember, this is just an example, on a real world you will have some more lines to catch some exceptions and so on. But for brevity, we are just returning all the lines. The findAll method is automaticaly generated from our CrudRepository interface, and this way, we don’t need to implement anything. Much more easy don’t you think?
Run it and you will see a result just like mine.

OK, now it’s time to add the other databases to the game. Inside our config package, create 2 more classes, called DatabaseSecond and DatabaseThird, and the let’s build something similar to the DatabaseMain. Duplicate the DatabaseMain.java file, refactor it renaming it to DatabaseSecond and DatabaseThird. After that remove the annotations @EnableTransactionManagement, @ComponentScan, @EnableJpaRepositories and @Primary from the 2 new classes, and rename all the mainXXX stuff to second and third. After that, fill the database.properties with the other connection parameters, just like mine and we are ready to go.
Now let’s put some magic on it. Let’s make this a multidatabase repository. Let’s create a helper class called EntityManagerUtils.java inside an utils package.
The first thing you will notice is that we have 3 autowired EntityManager, and you ask me why. This will be the entry points to our databases, and this class will be the router. Take a good look at the @Qualifier annotations on each entity manager, and you will recognize the names, they are the very same names we give to our entity managers during database config classes creation. We use the @Qualifier annotation to mark this dependency injection and flag it, so spring will not autowired the wrong connection for us. The getEm method, use a rudimentary method of binding each connection to a rule, and as I stated, we will use the URLs to route the databases. The getJpaFactory, will make the change to our JpaRepository so it will know the right database to connect.
To test it, let’s build a new rest repository, this time called MultiPersonRest, and let’s copy our base repository to speed up the things a little. With this step done, we can make some changes to the first RequestMapping anotation, changing from /person to /multiperson.If you run it right now, you will get the same result we had on the previous controller. To achieve our multi database part, we need some changes. First, let’s make a method that routes the call to the correct database, using our EntityManagerUtils. Then we will make some modifications to our getAll method and the we will build another one to test.
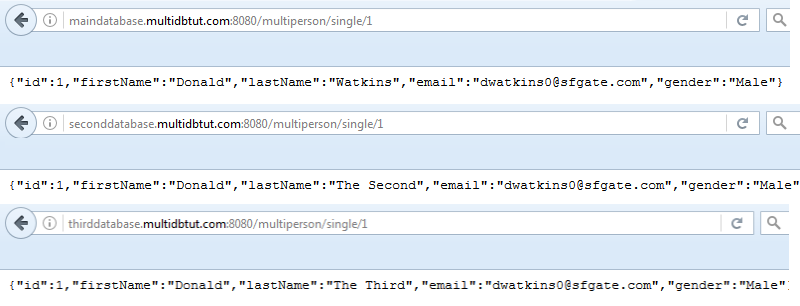
Make some modifications on your database, so you can check if it works, and you will get the differences like in my test. To test it, I’ve built another call to my rest controller, adding a call to a single result, using the ID as parameter.
The Conclusion
We build a multi database app in some minutes (OK you must have taken more than a couple of minutes reading and making this app right?) and you can see that it’s much more simple than you have first imagined. Apart from a normal project, we have some more database connections, and we have built just a single class to manage the database. You don’t need to use it with databases containing the same structure as I have stated, you can use multiple databases, containing different data, such as one for your clients and basic records, one for your sells, one for your client tickets and so on. Don’t forget to comment and share this article with your friends, and let me know if I made any mistake, and share some of your experiences with me, so we can discuss your difficulties and thoughts.
Check out the repository with the full code if you want it.